https://www.zwrotpodatkow.com/blogs/recipes-1.atom zwrotpodatkow - BLOG POSTS 2014-12-17T12:32:00-08:00 zwrotpodatkow https://www.zwrotpodatkow.com/blogs/recipes-1/16224237-how-to-grow-pickle-homegrown-peas 2014-12-17T12:32:00-08:00 2014-12-18T12:18:37-08:00 How to Grow & Pickle Homegrown Peas Sari M

More

]]>


Growing homegrown peas has always been a favorite by home gardeners.  They are delicious fresh or cooked, and store exceptionally well.   They freeze wonderfully, and are an easy crop to put up by canning.  

Regardless of the variety of pea you're growing, if you choose to can them, or pickle them, you'll have a wider window of when you can harvest them.  Pickling them will soften and sweeten even the more starchy pods, so if you're a little late in your harvest they'll work just fine for canning.


You'll start by planting your peas, early in the spring, as soon as your soil is workable.   Peas are a wonderful cool-season crop, so you can usually even sneak in a fall harvest of peas if you have room in your late summer/early fall garden. 

When planting your seeds, put them no deeper than an inch into the loosened soil.  Place them 2 inches apart.   Try making your rows up against a fence or trellis line so they'll be able to climb and grab onto them as soon as they are mature enough.


Peas can be grown in many different soil types, but they do require good drainage.   Try to keep them in soil with a pH of around 5.8-6.3.


Once your peas are ready to harvest, you'll need to continue to pull them from the vine on a daily basis. This will go on for a week or more if you have used succession planting methods.


If you plan on using them fresh, they are best used as soon as you harvest them.  They will also keep well in the refrigerator for a few days. 

 
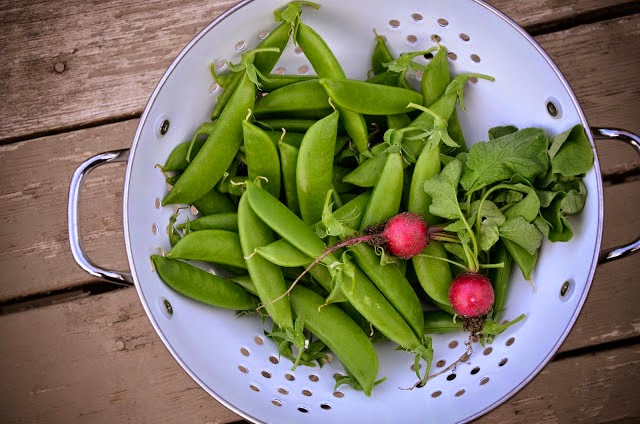
If you're looking to store your peas for "longer storage", you can blanch and freeze them, or pickle them. They do well with both methods, but pickled peas are quite the delightful addition to salads, sandwiches, cheese/fruit trays, or for snackin' right out of the jar.


How to Make Pickled Peas

An adaptation of Mixed Vegetable Pickles from Ball Complete Book of Home Preserving (Source)
Makes about eight  250ml jars (or  4 pint jars) 

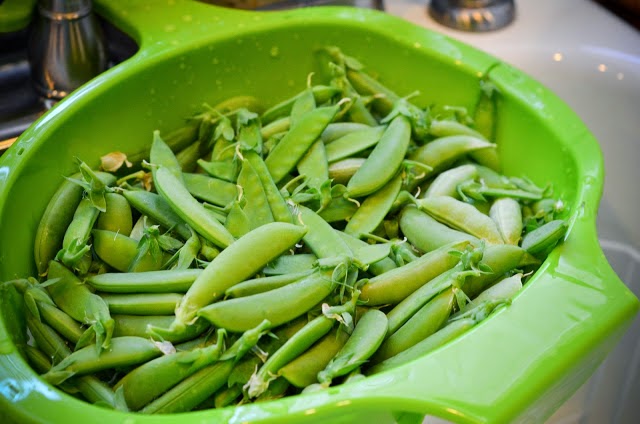
  • 2.5 lbs sugar snap peas, tips and center string removed
  • 1 cup kosher salt (I use Diamond brand) dissolved in about 1 gallon water, cooled
  • 4.5 cups white vinegar
  • 1 1/3 cup sugar
  • 1 tbs celery seeds
  • 2 tbs yellow mustard seeds
Put the snap peas in a large stainless steel or plastic container and pour the salt water over them. Let them brine for about 12 hours in the refrigerator.  After that time, drain and rinse the pods well with cold water.

In a stainless steel pot, bring the vinegar, sugar and spices to a boil. Allow to boil for a couple of minutes. Add the rinsed peas and bring to a boil. Turn down the heat and boil gently for a couple of minutes, enough so the pods are heated through. Pack the pods into clean, hot jars. Add hot pickling liquid, leaving 1/2 inch of headspace. (If you have leftover liquid, try making refrigerator pickled red onion. It's delicious on sandwiches.) Wipe rims, center lids on top, and screw on bands to fingertip tight. Process in a water bath canner for 15 minutes then let the jars rest in the canner for about 5 minutes before setting them to cool.  Eat right away or let them sit for a few weeks for the flavors to mellow. 
 

Try experimenting with your favorite "pickling brine" or adding peppers and garlic to your pickled peas. This recipe can be changed to suit your taste and the flavors you love.
]]>
https://www.zwrotpodatkow.com/blogs/recipes-1/15047557-how-to-make-pickled-tomatoes-in-just-5-minutes 2014-08-05T11:43:00-07:00 2014-08-05T11:53:29-07:00 How to Make Pickled Tomatoes, In Just 5 Minutes Sari M

More

]]>
Summertime means an abundance of tomatoes for most home gardeners, and along with that means finding new ways to preserve harvests when there's too much to eat fresh. 

An easy and delicious way to preserve some of your homegrown smaller tomatoes, such as the cherry and pear varieties are to pickle them.   Don't worry, this is a recipe that requires no special equipment such as waterbath canners, or canning tools at all, really.
 
What you will need:
20-30 small tomatoes (cherry and pear varieties work great)
-you can also use small romas-
1 pint container, such as mason jar, or anything with a lid. 
1/2 cup vinegar
1/2 cup water
1/2 Tbsp. pickling spice
1 Tbsp. sugar

Pick 20-30 small tomatoes.  We recommend Tiny Tim, Yellow Pear, Red Pear, White Cherry, Red Cherry, Chocolate Cherry & Black Cherry tomatoes for a recipe like this, but really, any small tomato will work.  


Wash all of your tomatoes and remove stems.

If you're using a few tomatoes that are larger than the cherry varieties, run a toothpick through them. This will help the brine to enter the center of the tomato. You don't need to do this with any of the cherry varieties. They are small enough.   Remove toothpicks and put all of the tomatoes into a 1 pint container. 

With 20-30 tomatoes, you should be able to fill a 1 pint container nicely. 


Add 1/2 Tbsp. of your favorite pickling spice to the container.


Go ahead and in a small saucepan heat together 1/2 cup vinegar, 1/2 cup water & 1 Tbsp of sugar until the sugar is dissolved. 

Pour hot brine over your tomatoes into your container. 

Seal container with a clean lid and let cool slightly before moving it into the refrigerator. 
As you can see, the smaller tomatoes skin will split slightly, allowing the brine to enter the center of the tomato, and the holes you poked in any larger tomatoes will help do the same. 

Let tomatoes marinate for a week, and then open to enjoy. Add them to sandwiches or salads.  Pair them with a cheese plate or eat them right out of the jar.
]]>
https://www.zwrotpodatkow.com/blogs/recipes-1/14993169-how-to-make-amazing-zucchini-chips 2014-07-30T09:52:00-07:00 2014-07-30T09:56:40-07:00 How To Make Amazing Zucchini Chips Sari M

More

]]>
It's the middle of summer and we've all got more zucchini & summer squash than we know what to do with....right?

A quick and easy way to use up some of those delicious vegetables are to dehydrate them into crunchy, crispy, healthy "chips".  You won't ever want another potato chip after you taste how delicious your own homemade zucchini chips can be.  

Start by picking squashes that are of a good size, because they'll shrink quite a bit in the dehydrator.  Don't pick them too large, they'll lose some flavor at that point.

Wash your squash and then slice using a "medium" or "thin" setting on your mandolin.  Watch your finger tips! 


Put all of the slices of zucchini into a bowl, and here's the secret to making the BEST zucchini chips you've ever had.  Salad dressing. Yes, salad dressing!  Put a Tbs. or so of your favorite salad dressing into the bowl, just enough to barely coat the zucchini slices.  Flavoring your zucchini chips is easy when you use your favorite salad dressings, olive oil, salt & pepper or any other dried herb that your family loves.  Experiment with flavors. Make each tray on your dehydrator a different flavor.  Just remember when adding wet ingredients to spice up the flavor of your chips, only add barely enough to cover the squash. The thinnest coating you can get on them.  When they dehydrate the flavors will only intensify. 

Dry on your dehydrator for 6-8 hours depending on how thick your chips were cut.  Pull from dehydrator when crisp, but not brown.    Let cool, then remove from dehydrator trays.  Store in an airtight container, and enjoy.  
Some of our favorite varieties to grow for these chips are: "Black Beauty", "Caserta" and "Cocozelle".
]]>
https://www.zwrotpodatkow.com/blogs/recipes-1/12390697-dont-toss-your-vegetable-scraps-make-stock-broth 2014-02-19T18:49:02-08:00 2014-03-05T10:03:04-08:00 Don't Toss Your Vegetable Scraps!....Make Stock/Broth! Sariann McDonald

More

]]>
Save your vegetable scraps to make homemade vegetable stock/broth!
Make sure your scraps are clean and not spoiled. Keep them in a bag in the freezer until you have enough to fill a pot with.

Here's your basic directions:
1. Heat oil in a soup pot.... Add your vegetable scraps and possibly even toss in garlic, parsley, thyme, or bay leaves. Cook over high heat for 5 to 10 minutes, stirring frequently.

2. Add a pinch of salt and enough water to cover the vegetables and bring to a boil. Lower heat and simmer, uncovered, for 30 minutes. Strain. Discard vegetables. At this point you can refrigerate the stock if you'll be using it soon or pressure can it for long term storage.
 
Some ingredients to consider: mushrooms, eggplant, asparagus (butt ends), corn cobs, fennel (stalks and trimmings), bell peppers, pea pods, chard (stems and leaves), celery root parings, marjoram (stems and leaves), basil, potato parings . . . Get the idea?
]]>
https://www.zwrotpodatkow.com/blogs/recipes-1/12238893-chocolate-chip-kale-cookies 2014-02-12T08:42:14-08:00 2014-02-12T09:06:34-08:00 Chocolate Chip KALE Cookies! Sariann McDonald

More

]]>
Chocolate chip cookies that contain a SUPERFOOD? Is it possible?
It is, and once you try it you'll likely never want to eat a regular chocolate chip cookie ever again! 
Chopped kale mixed into your cookie dough...
Ready to be rolled in plastic wrap and put into the refrigerator.
Just out of the refrigerator, fully chilled.
 
Purple Kale Chocolate Chip Cookies
  • 2/3 cup plus 1/2 cup flour
  • 1/8 tsp salt
  • 1/2 tsp baking soda (not baking powder)
  • up to 2/3 cup chocolate chips, depending on your preference
  • 4 tbsp brown sugar, coconut sugar, or white sugar
  • 1 tsp vanilla extract
  • 2 tablespoons coconut oil
  • 6 tablespoons milk of choice.
  • several small leaves of kale -any kind- (washed and stemmed)
Formed balls that have been rolled into sugar.
 
 
Preheat the oven to 375 degrees. Mix your dry ingredients & chips, then add in wet. Chop finely kale leaves and fold them into the cookie dough.  Form cookies and bake for about 10 minutes. Take out when still underdone–they’ll continue to cook while cooling, and so you don’t want them to get hard.  Pull them from the oven when the edges are JUST golden, and so is the bottom of the cookie. You don't want them dark brown.
 
**We highly recommend refrigerating the dough before rolling into balls. You can even roll the balls in sugar before placing them onto the cookie sheet. (my Favorite thing to do with cookies).
Each cookie only has around 20 calories!
]]>
https://www.zwrotpodatkow.com/blogs/recipes-1/12066529-easy-healthy-delicious-kale-chips 2014-02-04T12:17:06-08:00 2014-02-05T05:31:22-08:00 Easy, Healthy & Delicious Kale Chips Christopher Surabian

More

]]>
If you don't have a dehydrator, you should really pick one up.  They come in all sizes and prices, but start small. The basic ones will suit a small family just fine!
 
Kale is known as a "Super-food" for many good reasons! It has 45 different flavonoids that combined provide excellent antioxidant and anti inflammatory benefits.  Kale is naturally low in calories, supports the cardiovascular system and has natural detoxification benefits as well. 
This super food has risk lowering benefits for cancer and kale in the steamed form can provide you with better cholesterol.
We love to eat kale is by simply washing the leaves and removing them from the stem. Toss the leaves in a bowl with extra virgin olive oil, pepper and your favorite artisan sea salt.   Place kale leaves onto your dehydrator trays and walk away! Come back when they are dried all the way through, and crispy! Just like potato chips, but wow...so much better tasting, not to mention better for you!
]]>
https://www.zwrotpodatkow.com/blogs/recipes-1/7818887-vegetable-cooking-times-cheat-sheet-info-graphic 2013-05-05T22:26:45-07:00 2013-05-05T22:26:56-07:00 Vegetable Cooking Times Cheat Sheet [INFO-GRAPHIC] Christopher Surabian  

More

]]>
 

]]>